How to Insert a Table in Dreamweaver
An invisible table is the best way of organizing text an images on a web page, especially since HTML has no good way of creating margins and empty header- and footer space (all together called "white space", even if it is not white. Without a table to organize the layout of your page, text and images entered on the page will stretch from one edge of the screen to the other. This is both unsightly and tiring to read.
This short tutorial will walk you through the process of creating a simple, invisible table to aid the layout of your page.
- Start Dreamweaver.
- On the "File" menu, click on "New". This will open up a new, blank web page for you to work on.
- Now it's time to insert the table. Logically enough, any time you want to insert something on your page, you click on the "Insert" menu. Select the "table option."
- The "Insert table" dialog box, which looks like this, will
open up.

Fill out the values just like above. This will create an invisible table with three columns and three rows. The table will be invisible in a browser (like Explorer or Netscape) but will be outlined on the screen in Dreamweaver so that you can see it while you are working on your page. - When you have filled out the "Insert table" box, click OK.
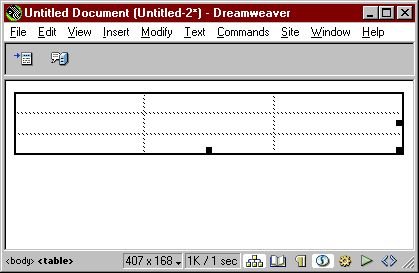
The table will be inserted on the page and will look something like
this (though your window will probably be larger):
- Now is the time to resize the table you just inserted to simulate
the look of margins.
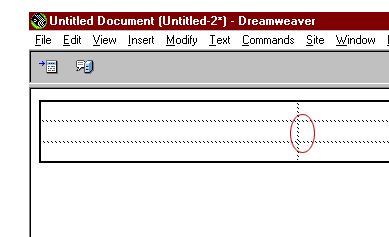
As you can see, the columns of the table are currently of equal width, but we will move the borders of the columns left and right respectively to make them serve as margins. To do this you point your mouse pointer to the right edge of the left column (by the red circle) and, holding down your left mouse button, drag the edge to the left, making the left column narrower. Repeat the procedure with the right column, making that one narrower as well. Your center column should now be the widest column. The width of your margin columns depend on how wide you want your margins to be. In other words, you decide yourself by dragging the edges of the column back and forth how wide you want the margins to be. - Now you can enter text in the center column. You simply place your
cursor in the center cell (second cell from the left, second cell from
the top)by pointing to it and clicking once . This cell will expand
as you add more text (or later, images and other interesting things).
You can start typing in your heading and whatever other information
you want to feature on the page, or you can cut and paste from another
application, like for instance, Microsoft Word, or perhaps even another
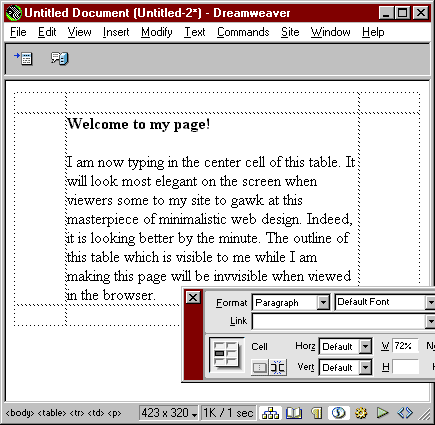
web page. Entering text in the middle cell may look something like this:
- Congratulations! You have just created a web page with a table layout. It looks pretty good, doesn't it? It will look even better when visitors come to your web site and see the page through a browser. But first, before we do anything else, go ahead and save your new page. Saving works just like in any other windows application.
- Click on the "File" menu. Select "Save as". Dreamweaver automatically save your page as a HTML document. Give your document a name that makes sense with regard to your content, such as "index.html" or "mypage.html"
- Now, in order to get an idea of what your page will look like in a
browser (remember, Dreamweaver is not a browser, it is an HTML editor),
click on the "File" menu and go down to the "Preview
in browser" option. Click on "iexplore." Your page will
now be opened up in a browser window (MS Explorer) and you will be able
to preview your page as it will look in a browser window when visitors
come to your site. The page I created above would look like this:
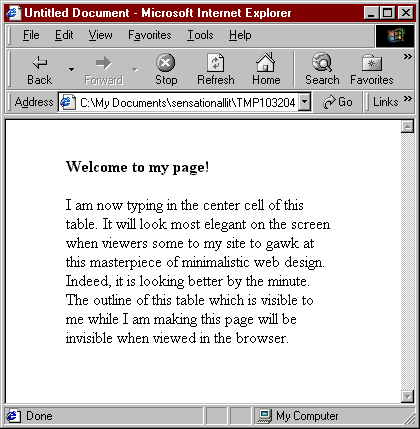
- As you can see, the table borders which were visible while designing
in Dreamweaver, are now invisible in the browser, but still organizing
the text so that the page has nice, neat margins.
>>End of tutorial
Back to web design resources for ENG 394.