Return
- The Lego body.
- What is the environment the robot should move in? (Plain, hazardous, open, closed...).
- What kind of tasks the robot should complete? Is there a time limit for finishing tasks?
- What is the robot's way of locomotion? (Legs, wheels).
- What kind of landmarks of the environment is the robot going to use to find its way? (Lines, colored walls, etc.). As a consequence, what are the best sensors and where they should be located in the robot's body?
- The Handy Board.
- Sensors.
- Touch (or bumper) sensors. These are digital sensors. The usual wiring of these sensors is to be normally open, this is, return a 0 when they are open and a 1 when they are closed (i.e., when the robot hits something with the bumper). However, they can be wired as normally closed, to invert the values. Touch sensors are mainly used to generate an action when an obstacle is found (this obstacle can be a wall, another robot, etc.). Readings from other sensors may be needed in order to find out what is the object that the robot most probably hit. You should install touch sensors in strategic places in your robot to be able to obtain as much information about the position or nature of the obstacle. These sensors are usually placed on the sides of the robots, although some seemingly complicated problems can be solved with a clever position of a touch sensor. For example, to find out the borders of a table, a touch sensor can be located at the bottom of the robot.
- Tilt sensors. These are actually a combination of two touch sensors side by side. When the robot is tilted, a moving element in the sensors closes the contact. This is useful, for example, to know if the robot is climbing a ramp.
- Photo resistors. These are analog sensors that return a value in the range from 0 (highly illuminated) to 255 (total blackness). Telling the difference between a black and a white surface is relatively easy with a photo resistor. However, be aware that changes in the ambient light might change the readings returned by a photo resistor. It is a good idea to cover these sensors in such a way that light is received only from the surface we want to read. Usually, a coned-shaped shading is enough.
- Infrared sensors. This type of sensor measures the amount of reflectance in a surface: a ray of infrared light is emitted and bounced on the surface we want to observe. These sensors are good for trying to detect different colors because they have their own light source. As with photo resistors, it is a good idea to cover the sensors so that the changes caused by ambient light affect minimally the readings.
- Interesting stuff
- Where to get the Lego kits.
- The MIT Handy Board Page. All information about the controller from the people who developed it. The user manual is here.
- Gleason Research (Handy Board Supplier). Here you can buy the Handy board and software.
- LEGO Dacta/PITSCO Innovative Education: (800) 362-4308. This is a good place to buy Lego pieces in bulk quantities (much cheaper than buying Lego kits at toy stores!).
- Newton Research Labs. This is a site that provides the IC language. It also has lots of cool robotics stuff.
One of the goals in this course is for students to gain experience in robot building. When designing a mobile robot, there are some questions that should be asked:
There are several tricks that can be used when designing a Lego robot. The art of Lego Design, by Fred Martin provides a first glance to Lego building covering topics as gear chains, structural integrity, and free wheels.
For our course, the preferred way of locomotion is by using wheels, given that our test arena is flat and the step parts are easy to climb. Students should decide how to power the wheels, and how to make the robot steer. These are some of the wheel configurations that have been successfully used in this course:
Two independent power wheels. This arrangement provides for a robot that is easy to steer, and that can do very sharp turns. Problems appear when you want this robot to move in a straight line!
One power wheel with power steering. This is the tricycle arrange, in which the front wheel both moves and steers the robot. This requires a little of ingenuity with the steering gears.
Tracks. This is a variation on the independent power wheels.
It provides extra traction and sometimes makes easier for the robot to
move straight.
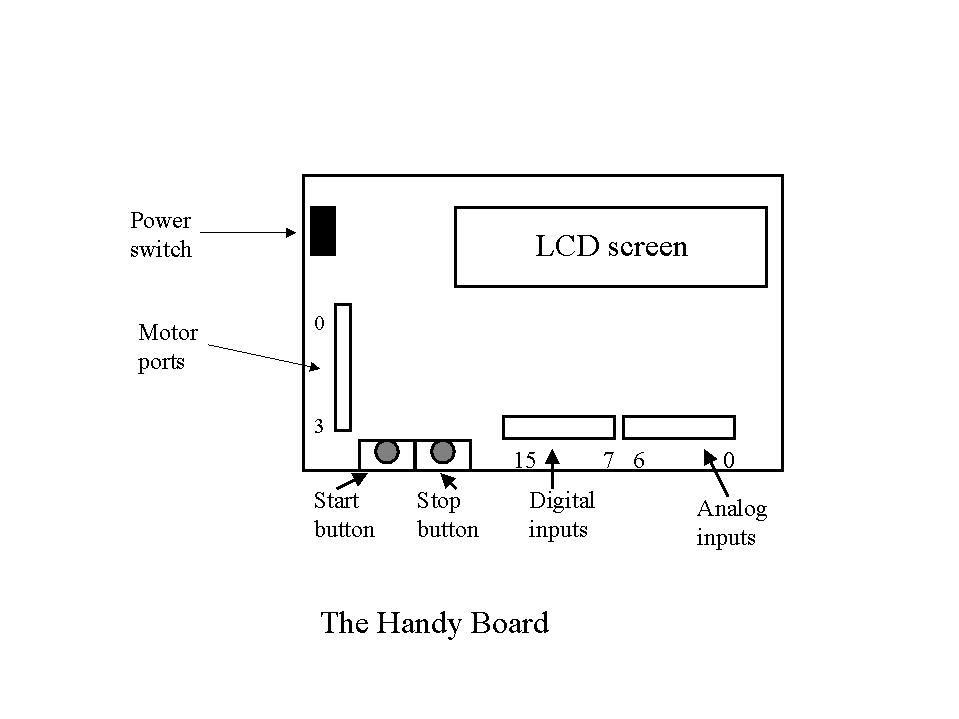
The Handy Board is a microcontroller based on the Motorola 68HC11 microprocessor. The Handy Board includes a 32K RAM, output ports for four motors, 16 input ports for sensors and a 16x2 character LCD screen. Additional information can be found in the Handy Board home page.
Some of the parts of the Handy Board are shown in the picture.
For a more detailed description of the Handy board, see the Handy Board Manual on the docs section of the Handy Board page.
If you aspire to build a more or less intelligent robot, you need to be able to obtain data about the environment. There are a variety of sensors that can be used for this purpose. Sensors can be classified in two categories: digital sensors and analog sensors. Digital sensors return discrete values (typically 0 or 1), while analog sensors return continuous values. One thing to remember about analog sensors is that they are not 100% accurate, so you should be ready to compensate for that in a program that interprets sensor readings. Let's describe the sensors available for our Lego robot in the lab:
Here are some pages related to Lego robots and robots in general.
Here are the pages of the students from this course.
Following is a list of sites where Lego blocks and the Microcontroller can be obtained: